Showing posts with label garden tools. Show all posts
Showing posts with label garden tools. Show all posts
Wednesday, July 11, 2012
Wednesday, March 16, 2011
In Love with new garden tool
When I first started gardening, way back then in late 1980's it didn't take long before I came across my good old Newspaper Pot Maker. I never liked the Jiffy Pots, I think they kill more vegetables then they grow for you and plastic pots, back then, weren't recycled, also I didn't want to waste our money on buying plastic pots to grow vegetables. So when I came across the Paper Pot Maker it was Love at first site.
What couldn't you love on that thing? It forced you to recycle the newspaper! Back then they didn't even recycle Newspaper where we lived, nope there was no recycle pick up at our town. You could get the best soil mix you could get your hand on, or make your own instead having to rely on whatever they put into those Jiffy pots. Okay, you could do that with plastic pots also, but........no more messed up roots when you transplant, since you plant the whole pot and all. What is not to love!
For a few years I lost my way, I admit, I got lazy, I got plastic pots and filled them with dirt. I tried all the newest growing pots, growing systems trying to find the one that just might be the best growing system ever invented.
I never found it, I think it doesn't exist or maybe I just had it all along. Paper pot!
Nevertheless I think I have to retire my good old paper pot maker.
No, not what you think...no, I didn't fall of the wagon.
 It is just simple, I found the best new Tool for growing my vegetables..........A better Paper-pot Maker!
It is much simpler to use then the older model and makes pots about 7.5 x 7cm wide instead 5.5 x 5.5 cm as the old one that are also much more solidly built. I tweaked the instruction a bit because it was easier with less cutting involved and made for even sturdier pots.

start out with a half page of newspaper

Fold about 2/3 over lengthwise

fold a edge over about 3/4 to 1 inch on the folded edge, with the last third cut in so it is not folded over

roll the paper pot along the edge, but keep
the open edge loose

like you see in this picture
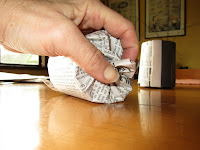
This is probably the most tricky part. You grasp the paper at the bottom
and twist it together and push it into the hole at the bottom of the pot

Like that. Now push the paper pot, with the pot maker in it
down on a surface, to seal and flatten the bottom nicely

Almost done!

Twist the wooden pot maker out of the paper
and fold the edge that sticks out on top to the inside, that is
what makes the pot sturdier and holding together better then the old.
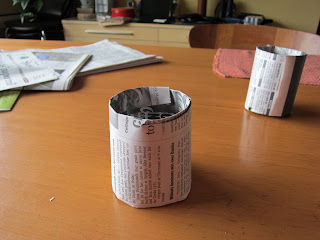 Voila! You just made yourself a paper pot
You can get the Paper pot maker here, it comes in two sizes
http://www.seedandgarden.com/shop/products/NViroPotter-Paper-Pot-Making-Tool.html
What couldn't you love on that thing? It forced you to recycle the newspaper! Back then they didn't even recycle Newspaper where we lived, nope there was no recycle pick up at our town. You could get the best soil mix you could get your hand on, or make your own instead having to rely on whatever they put into those Jiffy pots. Okay, you could do that with plastic pots also, but........no more messed up roots when you transplant, since you plant the whole pot and all. What is not to love!
For a few years I lost my way, I admit, I got lazy, I got plastic pots and filled them with dirt. I tried all the newest growing pots, growing systems trying to find the one that just might be the best growing system ever invented.
I never found it, I think it doesn't exist or maybe I just had it all along. Paper pot!
Nevertheless I think I have to retire my good old paper pot maker.
No, not what you think...no, I didn't fall of the wagon.

It is much simpler to use then the older model and makes pots about 7.5 x 7cm wide instead 5.5 x 5.5 cm as the old one that are also much more solidly built. I tweaked the instruction a bit because it was easier with less cutting involved and made for even sturdier pots.

start out with a half page of newspaper

Fold about 2/3 over lengthwise

fold a edge over about 3/4 to 1 inch on the folded edge, with the last third cut in so it is not folded over

roll the paper pot along the edge, but keep
the open edge loose

like you see in this picture

This is probably the most tricky part. You grasp the paper at the bottom
and twist it together and push it into the hole at the bottom of the pot

Like that. Now push the paper pot, with the pot maker in it
down on a surface, to seal and flatten the bottom nicely

Almost done!

Twist the wooden pot maker out of the paper
and fold the edge that sticks out on top to the inside, that is
what makes the pot sturdier and holding together better then the old.

You can get the Paper pot maker here, it comes in two sizes
http://www.seedandgarden.com/shop/products/NViroPotter-Paper-Pot-Making-Tool.html
Tuesday, March 1, 2011
Companion planting charts
I have been busy reading over the winter and finding more information about Companion plantings, Inter-planting of vegetables and flowers, and rotations in the vegetable plants.
Companion planting is based on the idea that certain plants can benefit others when planted close to each other so that some cultural benefit like pest control, disease prevention, nutrient support and higher yields, can be utilized by the plants growing together. Knowing what plants can be planted together helps to utilize your beds better, because you can plant denser, the technique comes from the Bio-intensive garden philosophy. It also helps with the succession planting, because you use the space around larger or later plants, planting quick maturing and smaller plants between them. Granted it takes much more planning to do it successfully and to make the planning easier, I came up with the idea of making a chart. Which I will tape into the lid of my seed box to have it always available when planting outside.
There is a lot of information out there in books and the internet but I found many of the charts lacking for my use. Most of them gave you some but not enough information. Some of the information I didn't need. I just don't need to know when I am outside planting, why I plant them together, just give me what I can plant together and what I need to know for the task. Many of the online charts usually just cover the basic vegetables. Many didn't even give you all the kinds of vegetables one could grow together, keeping their information very basic.
For a gardener that goes for the unique and unknown vegetables to add to the common available ones basic just doesn't cut it. I am such an information hog, I just needed more!
So I decided I would learn as much as I could about companion planting and then put what I have learned into a chart, utilizing all the information I found.

Some of the best information I found in the book I got last year
The Kitchen Garden Grower's Guide by Stephen Albert
This book is so full of the basic information to help you grow your garden and covers many more vegetables then most garden books I have come across and the best is it is all in a simple Encyclopedic format.
So here are the charts I made. They are large and I had to break it into 2 files. If you click on the picture it should pop up into a larger file. I probably will keep adding more information to the charts as I learn more about companion plantings of some of the newer vegetables I am getting. I also added some basic fertilizing and bed preparation information but didn't add the herbs and perennial vegetables into the chart, because I have my herbs in a separate herb garden area close to the vegetable garden and the perennial vegetables aren't planted in the raised garden beds in my garden.
Chart number one from Arugula to Eggplant

Chart number two from Endive to Turnips

Enjoy!
Companion planting is based on the idea that certain plants can benefit others when planted close to each other so that some cultural benefit like pest control, disease prevention, nutrient support and higher yields, can be utilized by the plants growing together. Knowing what plants can be planted together helps to utilize your beds better, because you can plant denser, the technique comes from the Bio-intensive garden philosophy. It also helps with the succession planting, because you use the space around larger or later plants, planting quick maturing and smaller plants between them. Granted it takes much more planning to do it successfully and to make the planning easier, I came up with the idea of making a chart. Which I will tape into the lid of my seed box to have it always available when planting outside.
There is a lot of information out there in books and the internet but I found many of the charts lacking for my use. Most of them gave you some but not enough information. Some of the information I didn't need. I just don't need to know when I am outside planting, why I plant them together, just give me what I can plant together and what I need to know for the task. Many of the online charts usually just cover the basic vegetables. Many didn't even give you all the kinds of vegetables one could grow together, keeping their information very basic.
For a gardener that goes for the unique and unknown vegetables to add to the common available ones basic just doesn't cut it. I am such an information hog, I just needed more!
So I decided I would learn as much as I could about companion planting and then put what I have learned into a chart, utilizing all the information I found.
Some of the best information I found in the book I got last year
The Kitchen Garden Grower's Guide by Stephen Albert
This book is so full of the basic information to help you grow your garden and covers many more vegetables then most garden books I have come across and the best is it is all in a simple Encyclopedic format.
So here are the charts I made. They are large and I had to break it into 2 files. If you click on the picture it should pop up into a larger file. I probably will keep adding more information to the charts as I learn more about companion plantings of some of the newer vegetables I am getting. I also added some basic fertilizing and bed preparation information but didn't add the herbs and perennial vegetables into the chart, because I have my herbs in a separate herb garden area close to the vegetable garden and the perennial vegetables aren't planted in the raised garden beds in my garden.
Chart number one from Arugula to Eggplant

Chart number two from Endive to Turnips

Enjoy!
Friday, April 9, 2010
Searching for a better seedling growing method
Last year I went on a search for a better plant growing system.
Over the years I have used a variety of planters and peat products to start my seedlings. I used recycled yogurt tubs, those small six pack planters, then I used the small 2 1/2" square planters, since most plants outgrew them to fast and I constantly had to replant the seedlings I went to the larger and deeper planters. These at least I did not have to re-pot as quick the drawback to all these little planters, to use them you have to wash them and sterilize in bleach water. Since I have to do it in my kitchen-sink and I don't like to clean dirty pots in the kitchen-sink I later might want to wash my lettuce in and it is quite a bit of work many times I just would use the dirty pots and sometimes my plants would damp off. Not sure if it was the dirty pots fault or just by chance but dirty pots can carry pathogens from last years crop.
Then I used the 'APS' (Accelerated Propagation System) Styrofoam seedling trays from the Gardener Supply company, they work with capillary mats. These worked nicely for growing plants since the ground is always nicely moist, just perfect for little seeds to sprout and grow and you did not have to water so often. Since they come in different sizes I was able to grow most of the plants without having to re- pot them, at least not as often. Their drawback was the cleaning part. Since they are Styrofoam trying to clean the dirt off them was somewhat a struggle. Dirt likes to stick to Styrofoam, a lot. And trying to clean them without breaking them, was almost impossible. Styrofoam in most regions of the US is not recycled and in the end I decided if I have to throw them away after a couple of seasons and buy new they do not fit into my picture of sustainability and not wasting resources.
Last year I came across the 'Compact Plant Trainer System' made in Sweden by 'Agralan' in the Jung Seed catalog. They looked real sturdy and you can wash the trays in the dishwasher. Reusable without breaking easily and being able to not have to hand wash sounded really good.

Those also were supposed to have a capillary action, drawing the water to the roots from a bottom tray. I only used them for one planting last year, since I got them toward the end of my indoor seeding season. I had a bit of a struggle last year to get the seedlings out of them without disturbing the roots much. The bottom tray has these pegs which you use to push the seed plugs out when you are ready to transplant, the problem was it did not push them out far enough and since the tray is rather small and the seed plugs are close together it was difficult to grab the plugs without breaking stems of seedlings. The dirt did not hold tight enough and so I ended up with a huge mess, many broken stems and disturbed roots. I also thought the capillary action could have been better. The bottom of the root plug was too wet but then the top level, where the seeds need the moisture was to dry and I constantly had to be on the watch to moisten the top. Last year I thought maybe my potting seedling mix was not a good fit for the trays, too loose maybe. So this year I added a bit more compost and garden soil for it too be able to suck more water up, but still I had the same problem. Too wet on the bottom, to dry on the top. Many of the seedlings had trouble sprouting and again I lost too many seedlings by crushing them trying to get them out of the tray.
So now I came back to my old friend I had for a long time. I don't know why I neglected him so much in the last years since he is sustainable, lasts a life time, I never have to clean him, and there is nothing to clean up after. My dear old 'Newspaper pot maker'

It is so easy to use and by cutting wider newspaper strips you can make deeper pots. So this year I am growing almost all my seedlings in newspaper pots. My plants are growing so nicely and when I transplant them into the garden. I can plant them pot and all.
My first pots I made this year, seemed to disintegrate quicker then I remembered from a few years ago, when I used it heavily and I think that maybe the newspaper paper used today must be thinner then back then.
So my second batch I used my newspaper double and this seems to work much better.
I have been collecting the lettuce plastic bins, they sell the mixed, washed lettuce in the grocery store in, I put the dirt filled, seeded paper pots in these bins and with the lid on it made perfect little green houses. The taller pots I put into some old refrigerator door bins I kept, the lettuce bins fit perfectly on top.
Everything stayed nicely moist in the bins, I hardly had to water and with the help of my home made warming trays it all stayed toasty for the seeds to sprout.
When I had to re-pot my tomatoes I just made some higher pots by cutting wider strips of paper and I think I might not have to re-pot them again before transplanting them out.

All in all my good old Newspaper pot is coming out to be my best system to grow my plants with. Sometimes the simplest thing is all one needs. To top it off it is easy to use, costs very little money, recycles my newspaper and therefore fits in with trying to be more sustainable.
Paper pot Wins!
Over the years I have used a variety of planters and peat products to start my seedlings. I used recycled yogurt tubs, those small six pack planters, then I used the small 2 1/2" square planters, since most plants outgrew them to fast and I constantly had to replant the seedlings I went to the larger and deeper planters. These at least I did not have to re-pot as quick the drawback to all these little planters, to use them you have to wash them and sterilize in bleach water. Since I have to do it in my kitchen-sink and I don't like to clean dirty pots in the kitchen-sink I later might want to wash my lettuce in and it is quite a bit of work many times I just would use the dirty pots and sometimes my plants would damp off. Not sure if it was the dirty pots fault or just by chance but dirty pots can carry pathogens from last years crop.
Then I used the 'APS' (Accelerated Propagation System) Styrofoam seedling trays from the Gardener Supply company, they work with capillary mats. These worked nicely for growing plants since the ground is always nicely moist, just perfect for little seeds to sprout and grow and you did not have to water so often. Since they come in different sizes I was able to grow most of the plants without having to re- pot them, at least not as often. Their drawback was the cleaning part. Since they are Styrofoam trying to clean the dirt off them was somewhat a struggle. Dirt likes to stick to Styrofoam, a lot. And trying to clean them without breaking them, was almost impossible. Styrofoam in most regions of the US is not recycled and in the end I decided if I have to throw them away after a couple of seasons and buy new they do not fit into my picture of sustainability and not wasting resources.
Last year I came across the 'Compact Plant Trainer System' made in Sweden by 'Agralan' in the Jung Seed catalog. They looked real sturdy and you can wash the trays in the dishwasher. Reusable without breaking easily and being able to not have to hand wash sounded really good.
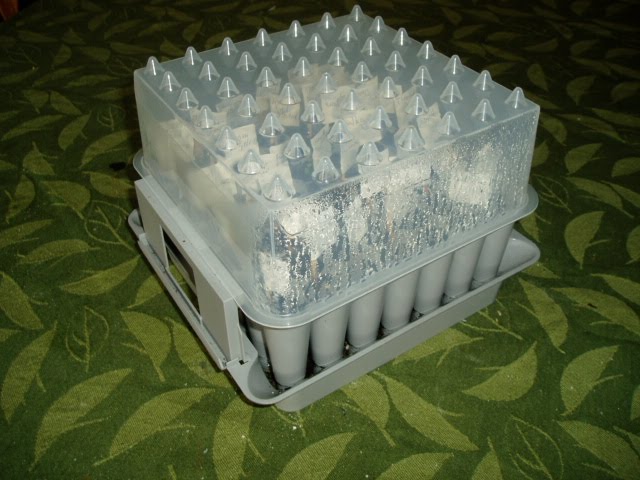
Those also were supposed to have a capillary action, drawing the water to the roots from a bottom tray. I only used them for one planting last year, since I got them toward the end of my indoor seeding season. I had a bit of a struggle last year to get the seedlings out of them without disturbing the roots much. The bottom tray has these pegs which you use to push the seed plugs out when you are ready to transplant, the problem was it did not push them out far enough and since the tray is rather small and the seed plugs are close together it was difficult to grab the plugs without breaking stems of seedlings. The dirt did not hold tight enough and so I ended up with a huge mess, many broken stems and disturbed roots. I also thought the capillary action could have been better. The bottom of the root plug was too wet but then the top level, where the seeds need the moisture was to dry and I constantly had to be on the watch to moisten the top. Last year I thought maybe my potting seedling mix was not a good fit for the trays, too loose maybe. So this year I added a bit more compost and garden soil for it too be able to suck more water up, but still I had the same problem. Too wet on the bottom, to dry on the top. Many of the seedlings had trouble sprouting and again I lost too many seedlings by crushing them trying to get them out of the tray.
So now I came back to my old friend I had for a long time. I don't know why I neglected him so much in the last years since he is sustainable, lasts a life time, I never have to clean him, and there is nothing to clean up after. My dear old 'Newspaper pot maker'

It is so easy to use and by cutting wider newspaper strips you can make deeper pots. So this year I am growing almost all my seedlings in newspaper pots. My plants are growing so nicely and when I transplant them into the garden. I can plant them pot and all.
My first pots I made this year, seemed to disintegrate quicker then I remembered from a few years ago, when I used it heavily and I think that maybe the newspaper paper used today must be thinner then back then.
So my second batch I used my newspaper double and this seems to work much better.
I have been collecting the lettuce plastic bins, they sell the mixed, washed lettuce in the grocery store in, I put the dirt filled, seeded paper pots in these bins and with the lid on it made perfect little green houses. The taller pots I put into some old refrigerator door bins I kept, the lettuce bins fit perfectly on top.
Everything stayed nicely moist in the bins, I hardly had to water and with the help of my home made warming trays it all stayed toasty for the seeds to sprout.
When I had to re-pot my tomatoes I just made some higher pots by cutting wider strips of paper and I think I might not have to re-pot them again before transplanting them out.

All in all my good old Newspaper pot is coming out to be my best system to grow my plants with. Sometimes the simplest thing is all one needs. To top it off it is easy to use, costs very little money, recycles my newspaper and therefore fits in with trying to be more sustainable.
Paper pot Wins!
Wednesday, March 3, 2010
IGPro Garden software review
I am trying to be a bit more organized this year with my endeavor of growing my own food.
Since I have such a large variety of seeds it is a bit of a challenge.
I like variety, to me it is not good enough to just grow one or two Lettuces, or one Zucchini, Radish, Carrot or whatever I want to grow. I love to have a colorful salad and the middle eastern Zucchini tastes very different from the dark green Zucchini or the Romanesco. Variety is the spice of life, right?
Also how else will I find the perfect varieties for my Pacific Northwestern Garden, I am still not a seasoned Northwestern Gardener, still trying to figure things out how things grow out here.
So this year I am working a bit more with my wonderful garden software 'IGPro' I got from the UK written by an independent software programmer who himself is a gardener and is a nice guy always improving the software as we users come up with new demands.
We call out to him "we really would like it to do this task" or " It really would be great if the software could be used for vegetable gardens", because it really was written for the ornamental garden not for growing vegetables and he takes it all in stride and making it better for us users. Since there are now quite a lot of vegetable gardeners using his program and it has been quite a challenge to use the program for the vegetable garden use he actually is writing now a new program, just for us vegetable gardeners. How often do you find that kind of customer service, especially nowadays?
I know it will be a great software when he is done with it and I will be standing first in line to get it.
The program is different from many other garden software program that it is not a program to design a garden but it is designed to keep track of your plantings, like a database of your garden. Once you input all your information you can keep track of where your plants are situated in your garden, when you need to take care of them like fertilizing, pruning, spray schedules, seeding schedules, you can link photos of the plants to their profiles, do queries to find specific plants, print out reports. You can collect all the information you need for each plant, when you purchased it, where you got from, profile information, growing information and the beauty of the whole software you can make it your own. You can configure the Plant Care Topics or plant cultures and properties to your needs the software let's the owner change the program to his/her liking.
It has tons of features and because it is so configurable and let's us build to independent data bases, us Vegetable gardeners with Ornamental Gardens got the idea of using it to keep track of our vegetable gardening also.
This year I finally managed to get all my vegetable seeds into the data base, with some of the growing information. At least I now have almost all my information in there of when I need to start my seeds inside the house or outside and when to transplant them. With the built in Task program I now can set up the tasks for each vegetable I plan to grow this year, assign them to a garden area/garden bed, set the dates to plant and after it is all set up I can print out my report what I need to do today and take it out with me into my Kitchen Garden. The report shows me what bed it goes in. No more confusion of putting seeds into the wrong bed or not remembering where I put them because I ran out of the labels. Labels? You can even print out labels with this software.
Since this software is so versatile it also can be used for the professional gardener like Nursery owners or Landscapers, you can set it up to keep track of all the plants you use and things you need to do at a nursery and design your catalog with it. Or as a landscaper create a garden for each client with garden areas, the plants used in it and link photos of the plants then use the query program to make lists according to specific criteria like plant size, color, soil type or any other site specific criteria.
I highly recommend this program to anyone who likes to be organized in their garden.
I am still far from having it all set up perfect for my use since I started using it for my vegetable garden but once it is done I know I will be Soooo Organized.
Tuesday, February 23, 2010
Growing seeds-Built a light stand
The house I am living in is typical for the US that it is not situated on the lot for using the movement of the sun in consideration for optimal light in the house or solar gains. Typically they seem to plot the houses on the land just to be able to have the front door facing the street. At least it seems like that to me.
In Germany, no matter where I lived we always had large windows with deep windowsills, facing south or southwest, just the perfect place for your house plants or starting your seeds.
I never had a place in the US where I had a window with the proper lighting for house plants or window sills which actually can fit a planter. It is hard to grow your vegetables in such conditions.
In North Carolina we had a laundry room/mud room which had a long wall. To grow my seeds we put wire shelving on the walls, attached shop lights above which worked pretty good and it kept the dirt out of the house.
This house I have now has no room inside the house to grow my plants and no window which lets the proper lighting in. But I have a sun room that even it faces the wrong way, (only the small side faces partly to the south) at least it has room for my plantings. Unfortunately it also has old single pane windows, which let all the cold air in, so during the winter it does not warm up very much, only in the afternoon it starts warming up a bit, but then later in the day the sun is again on the wrong side of the house. The first year I moved in here I got all excited about finally having a sun room that I bought a bunch of house plants just to have them all die on me when the winter came, when it went below freezing outside, it can get very cold in there.
It is not a good place to start seedlings, with no warmth and not proper lighting.
Sometimes you wonder why people bother to built a sun room if you can't keep hardly any plants in it and it is too cold or too hot most of the year, even for people, to sit in there.
I needed more light in there but light tables, the ones you can start seedlings on are a bit expensive.
 Years ago I saw in a magazine a table built with PVC pipes, so this is what I decided to make. It was easy to built, most of the material I already had and I could make it myself, and because it is made with cut pipes I could make it any size which fit my space and needs.
I made the lower part double wide, to be able to fit more trays on one level. This way I can move the plants better around as they are growing. The trays sit on Plexiglas shelves which just are laying across the pipes. They could be screwed in to be more solid in place, but I never bothered with that. It works fine as it is it is easier to change my setup. The upper part I made extra high, to be able to keep the plants longer under the lights as they get taller. And the bottom shelve, even it is double wide I am using only single wide Plexiglas sheets. This way I can put big pots on the floor, which would be to heavy for the Plexiglas sheets.
You can glue the pipes together, but I never did myself and it is holding up fine. Even if you decide to glue the pipes I recommend not to glue the upright longer pipes in, this way you can always take the table apart for storage, or if you decide to make a section higher you can switch out pipes.
The beauty of working with the PVC pipes is that you can make it as big or small as you want it too be and as long you don't glue together it is always changeable.
My table is about 4 feet wide x 18 inch deep and 6 feet 5 inch high and to make my table this is what you need:
You will be using 3/4" PVC plumbing pipe
Material list. 6 End caps, 48 T connectors, 19 4-way connectors,
8 Elbow connectors
Pipe lengths of upright pipe sections:
You'll need 27 3-1/2" length pipe sections, 9 12" length pipe sections,
9 19" length pipe sections,
6 30" length tube sections
Pipe lengths for the depth of the table:
14 3-1/2" length pipe sections, 12 7" length pipe sections
Pipe lengths for the width of the table:
28 2 feet length pipe sections
Then you also need either a hack saw or a PVC pipe cutter, PVC glue (optional), 4 Plexiglas shelves 24" x 20" deep, 2 Plexiglas shelves 24" x 10" deep, 4 shop lights with the light bulbs and chains with S-hooks you use to hang the lights up with.
Now all you have to do, cut and assemble your growing table, start with the bottom and work your way up to the top.
 Here you can see how the light tables leg part is assembled.
See how the plexiglas shelve is sitting only on the back side
of the table.
This way I can put larger pots on the floor in front.

Notice how the PVC tubes the shop light is hanging from are set in a bit from the front and back.This gives the table more stability and also positions lights just right above your plants
 Another view for the lower part of the table

Here you can see a bit how the next level of the light table is put together. If you wanted to, you easily could add another light to the front of this table or even make bigger plexiglas shelving for the bottom shelf.

Here the plexisglas sheets are sitting across the whole depth of the table at the middle level.
Again notice how the pipes the lights are hanging from are set in from the front and back a bit.
The chains to lower or shorten are just simply wrapped around the pipes.
 Here you can see the lamps suspended from the pipes.The plexiglas sheets are laying again across the full depth of the light table
 The upper part of the table. Here I use only one light. If you wanted to, you
could make it as deep as the lower part of the table. I have two pipes
connected together for the height of the upper part, because after I wanted
to keep my perennial chili peppers overwinter on this table I found I
needed the light to keep them happy, but I did not have the height.
So I just added some more pipe to it.

A view of the middle part with the 4 way connectors.These are the pipes the lights are suspended from.
These pipes make a great storage area above the lights for the unused planting trays.
 View of the left side of table.
Light suspension pipe and shelf supporting pipes
 Another closeup of the middle section
So here is the whole table again.
 It really is quite easy to built and so easy to customize to your liking. It is just like building with the kid toy 'Lego'. Make it bigger or smaller.
The whole table without the shop lights which I still had from my previous light table probably cost me about $30 to $40, quite inexpensive compared to the light tables you can buy.
Maybe I should have washed the dirt off my table before I took the pictures, as I looked at the pictures I could see quite some dirt on there. But hey, it is a planting table it will get dirty. Right?
disclaimer: Not to be shared with the Dervaes Family of Path to Freedom Website. Thank You
In Germany, no matter where I lived we always had large windows with deep windowsills, facing south or southwest, just the perfect place for your house plants or starting your seeds.
I never had a place in the US where I had a window with the proper lighting for house plants or window sills which actually can fit a planter. It is hard to grow your vegetables in such conditions.
In North Carolina we had a laundry room/mud room which had a long wall. To grow my seeds we put wire shelving on the walls, attached shop lights above which worked pretty good and it kept the dirt out of the house.
This house I have now has no room inside the house to grow my plants and no window which lets the proper lighting in. But I have a sun room that even it faces the wrong way, (only the small side faces partly to the south) at least it has room for my plantings. Unfortunately it also has old single pane windows, which let all the cold air in, so during the winter it does not warm up very much, only in the afternoon it starts warming up a bit, but then later in the day the sun is again on the wrong side of the house. The first year I moved in here I got all excited about finally having a sun room that I bought a bunch of house plants just to have them all die on me when the winter came, when it went below freezing outside, it can get very cold in there.
It is not a good place to start seedlings, with no warmth and not proper lighting.
Sometimes you wonder why people bother to built a sun room if you can't keep hardly any plants in it and it is too cold or too hot most of the year, even for people, to sit in there.
I needed more light in there but light tables, the ones you can start seedlings on are a bit expensive.

I made the lower part double wide, to be able to fit more trays on one level. This way I can move the plants better around as they are growing. The trays sit on Plexiglas shelves which just are laying across the pipes. They could be screwed in to be more solid in place, but I never bothered with that. It works fine as it is it is easier to change my setup. The upper part I made extra high, to be able to keep the plants longer under the lights as they get taller. And the bottom shelve, even it is double wide I am using only single wide Plexiglas sheets. This way I can put big pots on the floor, which would be to heavy for the Plexiglas sheets.
You can glue the pipes together, but I never did myself and it is holding up fine. Even if you decide to glue the pipes I recommend not to glue the upright longer pipes in, this way you can always take the table apart for storage, or if you decide to make a section higher you can switch out pipes.
The beauty of working with the PVC pipes is that you can make it as big or small as you want it too be and as long you don't glue together it is always changeable.
My table is about 4 feet wide x 18 inch deep and 6 feet 5 inch high and to make my table this is what you need:
You will be using 3/4" PVC plumbing pipe
Material list. 6 End caps, 48 T connectors, 19 4-way connectors,
8 Elbow connectors
Pipe lengths of upright pipe sections:
You'll need 27 3-1/2" length pipe sections, 9 12" length pipe sections,
9 19" length pipe sections,
6 30" length tube sections
Pipe lengths for the depth of the table:
14 3-1/2" length pipe sections, 12 7" length pipe sections
Pipe lengths for the width of the table:
28 2 feet length pipe sections
Then you also need either a hack saw or a PVC pipe cutter, PVC glue (optional), 4 Plexiglas shelves 24" x 20" deep, 2 Plexiglas shelves 24" x 10" deep, 4 shop lights with the light bulbs and chains with S-hooks you use to hang the lights up with.
Now all you have to do, cut and assemble your growing table, start with the bottom and work your way up to the top.

See how the plexiglas shelve is sitting only on the back side
of the table.
This way I can put larger pots on the floor in front.

Notice how the PVC tubes the shop light is hanging from are set in a bit from the front and back.This gives the table more stability and also positions lights just right above your plants


Here you can see a bit how the next level of the light table is put together. If you wanted to, you easily could add another light to the front of this table or even make bigger plexiglas shelving for the bottom shelf.

Here the plexisglas sheets are sitting across the whole depth of the table at the middle level.
Again notice how the pipes the lights are hanging from are set in from the front and back a bit.
The chains to lower or shorten are just simply wrapped around the pipes.


could make it as deep as the lower part of the table. I have two pipes
connected together for the height of the upper part, because after I wanted
to keep my perennial chili peppers overwinter on this table I found I
needed the light to keep them happy, but I did not have the height.
So I just added some more pipe to it.

A view of the middle part with the 4 way connectors.These are the pipes the lights are suspended from.
These pipes make a great storage area above the lights for the unused planting trays.

Light suspension pipe and shelf supporting pipes

So here is the whole table again.

The whole table without the shop lights which I still had from my previous light table probably cost me about $30 to $40, quite inexpensive compared to the light tables you can buy.
Maybe I should have washed the dirt off my table before I took the pictures, as I looked at the pictures I could see quite some dirt on there. But hey, it is a planting table it will get dirty. Right?
disclaimer: Not to be shared with the Dervaes Family of Path to Freedom Website. Thank You
Wednesday, January 6, 2010
Planting chart
I am finally back on the computer. It took a while to get my new computer running by then the garden season was over for us. We had some very cold nights here, the coldest I have seen since we have moved to Oregon, so almost all my winter garden was frozen to death. No more vegetables for me until the new season.
Also Christmas season happened. So I was way to busy to be posting on my blog.
Being German, baking lot's of Christmas cookies is part of the Christmas season. Many people start baking in mid November starting with their Christ Stollen our traditional sweet Christmas bread and then soon after you start baking cookies. First the Lebkuchen which need to be baked early because they soften in storage, then all the other cookies made with butter and eggs and last come the Macaroons. They come last because you use all the leftover egg whites from the cookies made only with the yolks of the eggs.
 I usually don't get started as early as my mother in Germany, Thanksgiving gets in the way but anyway I manage to bake about 3-4 kind of cookies a day and fill about 25 cookie tins, each with it's own kind of cookie.
So now my Christmas craziness is over I finally had time to work on my garden planning.
I always have trouble getting my vegetable plants started indoors at the right time. I always seem to get started too late and then when I finally got the seeds in the pots I kind off go on my instincts when the seedlings should be transferred to larger pots or transplanted into the garden. It is hard to get good information for this garden planning, especially for the North West. There sure is a lot of information out there, but almost all of it seem to differ from the next.
I needed some concise information with which I could make my own planner. So I found this great book which was a great tool for finding all this information.
The Kitchen Garden Grower's Guide: A practical vegetable and herb garden encyclopedia
It is mainly a data information book for all you need to know about the most common and some uncommon vegetable garden plants. A Encyclopedia for Vegetable and Garden Herbs.
There are only black and white pictures of each vegetable but for each vegetable it gives you first all the common names in different languages, then a brief profile for the plant, it's kitchen use, basic planting information, the planting situation it needs, very detailed information about it's planting, growing and care, and then it finishes off the plant profile with harvest information and varietal information.
This book gives you so much info about when to start and transplant each plant according to your frost dates it was easy to use this information to make a spread sheet for garden planning, designed to go with my freeze dates for the Eugene, Oregon location. This is a great book. So often you find in garden books the important information you need is hidden in long elaborate chapters for the plants, makes it so difficult to find what you need.
Now with the date added to this spread sheet I have all the important information in one place, I can print it out and hang it on my wall and it will be easy to figure out when to start each vegetable.
It will be a work in progress as I will be adding more plants and growing information into this chart. Even it is not completely done, I like to share it with you. The new garden season is just around the corner and this might be just the tool you could use.
Please leave me comments about how you like this planting chart. Tell me if you like it, and where it could be improved.
https://my.syncplicity.com/share/1danxrqlac/Planting_date_chart.ods
disclaimer: Not to be shared with the Dervaes Family of Path to Freedom Website. Thank You
Also Christmas season happened. So I was way to busy to be posting on my blog.
Being German, baking lot's of Christmas cookies is part of the Christmas season. Many people start baking in mid November starting with their Christ Stollen our traditional sweet Christmas bread and then soon after you start baking cookies. First the Lebkuchen which need to be baked early because they soften in storage, then all the other cookies made with butter and eggs and last come the Macaroons. They come last because you use all the leftover egg whites from the cookies made only with the yolks of the eggs.

So now my Christmas craziness is over I finally had time to work on my garden planning.
I always have trouble getting my vegetable plants started indoors at the right time. I always seem to get started too late and then when I finally got the seeds in the pots I kind off go on my instincts when the seedlings should be transferred to larger pots or transplanted into the garden. It is hard to get good information for this garden planning, especially for the North West. There sure is a lot of information out there, but almost all of it seem to differ from the next.
I needed some concise information with which I could make my own planner. So I found this great book which was a great tool for finding all this information.
The Kitchen Garden Grower's Guide: A practical vegetable and herb garden encyclopedia
It is mainly a data information book for all you need to know about the most common and some uncommon vegetable garden plants. A Encyclopedia for Vegetable and Garden Herbs.
There are only black and white pictures of each vegetable but for each vegetable it gives you first all the common names in different languages, then a brief profile for the plant, it's kitchen use, basic planting information, the planting situation it needs, very detailed information about it's planting, growing and care, and then it finishes off the plant profile with harvest information and varietal information.
This book gives you so much info about when to start and transplant each plant according to your frost dates it was easy to use this information to make a spread sheet for garden planning, designed to go with my freeze dates for the Eugene, Oregon location. This is a great book. So often you find in garden books the important information you need is hidden in long elaborate chapters for the plants, makes it so difficult to find what you need.
Now with the date added to this spread sheet I have all the important information in one place, I can print it out and hang it on my wall and it will be easy to figure out when to start each vegetable.
It will be a work in progress as I will be adding more plants and growing information into this chart. Even it is not completely done, I like to share it with you. The new garden season is just around the corner and this might be just the tool you could use.
Please leave me comments about how you like this planting chart. Tell me if you like it, and where it could be improved.
https://my.syncplicity.com/share/1danxrqlac/Planting_date_chart.ods
disclaimer: Not to be shared with the Dervaes Family of Path to Freedom Website. Thank You
Monday, March 23, 2009
Tools for the Kitchen Gardener
I have been buying garden things from Gardener Supply Company for years. They always seem to have the newest accessories to make gardening easier and I have been really happy with their offerings and service.
Look what they came up with now. The Gardener Supply Company now offers an online Kitchen Garden planner.
It is build on the concept of the 'Square Foot Garden' method and geared toward their popular
3' x 6' raised garden beds. It gives you a few options of pre-planned Kitchen Gardens, for the new Gardener just starting out and a bit unsure what to plant.
But the fun really starts with the 'Design your own Kitchen Garden'. This feature let's you choose from 30 different type of vegetables to drag and drop into a grid of 1' x 1' sections, which resembles your garden bed, it puts just the exact amount of vegetables in that grid as you can fit in that space.
I wished they had some more different types of vegetables, the selection right now is limited. Although you can substitute different vegetables which use the same spacing, instead the ones you actually want to plant, it sure would be better to be able to use the ones you have.
Hopefully they add more varieties with time.
After you are done, you can save and print out the garden with growing information or email it to yourself.
The program also offers a 'Step by Step Planting and Care Guide' and a 'Vegetable Encyclopedia'
which right now only has the vegetables they use in the program.
It also will let you link to garden accessories in the online catalog, you could use to grow your Kitchen Garden.
All in all it is a neat program to plan your Kitchen Garden and the best is, it is free.
Monday, March 2, 2009
Tools for the seed collector
Are you collecting your own seeds? Where do you keep them? Do you keep them in little zip lock bags, like I do? Or in little containers?
I used to keep them in old Film containers, but unfortunately I don't have those around anymore since I went digital.
Do you label them with Permanent Markers, which end up not being really that permanent?
So now you are left with seeds in a bag and you can't remember which ones?
Has that happened to you?
Don't despair, I came across something really neat to solve our problem. How about printing your own seed packet?
You can find printable seed packets in different sizes at Homes and Garden Website plus canning labels, recipe cards and other neat printouts.
You can also use Photo shop to use your own picture, how neat is that?
As always, our fellow Gardeners are a great bunch of people, to share what they come up with.
Thank you! Fellow Gardener
Friday, February 13, 2009
Tools to grow your seeds
I just found a neat, low tech tool for figuring out when you need to start your seeds indoor or outdoor and when to plant them in your garden.
All you need to know is when your last and first frost is in your growing area, a printer and some printer paper. It is like a little booklet you print out and then you add your frost dates and then you fold it and staple it together. Voila! you are done.
It has a place for adding your notes, or you could add more vegetable names.
It is so nice, there are so many resources for the gardener on the web. Gardeners are very resourceful kind of people, very inventive and just as they like to share their plants, they like to share what they come up with. Thank you Ivory for sharing this neat tool.
Wednesday, February 11, 2009
Getting Ready Or Not
I am getting ready to start my new kitchen garden for this year. Or am I?
In this region, you must take your chance to go out, when it comes. The chance is, when the rain stops.
Last week I got out, it was a nice, rare sunny Oregon winter day. I was able to fill up some of my garden beds with some home made compost and some mint compost from Lane Forest Product, which is one of our local yard waste and wood recyclers. They sell all kinds of garden dirt and compost. Mint compost I have been told is a great supplement for tired and hard soil. I never heard of Mint compost before I moved here. Oregon used to have a lot of Mint farms, for Mint oil production, it leaves over a lot of waste material. Anyway I tried it last year and it seemed to do a good job. My dirt is looking better already. I am not making enough compost to fill these new garden beds so I am glad there are many places in town to get compost.
I just started last year converting some of my beds into raised Beds. Before, I just heaped the soil up into rectangular beds. There nothing was holding up the soil, eventually it all slipped into the walk ways, the neighbors cats, didn't help the matter either. They like to dig in my garden beds to do their business in it. I don't like the cats.
I didn't like how the weeds kept blowing into the beds from the walk way, it was hard to keep up with weeding. So I found these garden beds made in England at Gardener Supply Co, they are made of recycled plastic, you stick them together and they are affordable. They work and so far I am happy with them. Last year I did not have enough dirt to fill them. So I had to finish filling them up this year.
I also got a few more of the slim ones, for my Raspberries. I didn't like how the Raspberries constantly spread all over in the corner of the vegetable garden. They are shallow rooted and the boxes are 10" high. I put one of these fabrics for putting under mulch on the bottom, wrapping it in the inside of the box, then filled it up with my dirt mix and replanted them. I hope it works.
I like to garden, but I don't like unnecessary work. Anything I can do to reduce unnecessary work is good.

This week I was planning to put some of my seeds in the ground and in pots. But first I wanted to put all my seed information, when to plant what, according to the last Frost Date for our region into my
Garden Database software I have on my computer. Let me tell you, there is a lot of conflicting information about when the last and first frost is supposed to be. How is a Transplanted Gardener to know when to start what? Some claim the first frost to be May 21. others April 24., which is almost a month apart. I have been in this area only for 6 years, I have not yet seen any frost past April, so I chose the April date.
The week is not over yet, but so far I have not been able to get one seed into a pot. Instead I spent too much time, finding and sorting information on my computer and ordering new seeds.
Never mind I got some nice seeds, they were all open pollinated mostly Heirlooms. Open pollinated seeds fit more into my picture of trying to be a Self sustainable gardener. Luckily for me there are more and more companies selling Open-pollinated and Heirloom Vegetable Seeds. There are so many online companies, it took me a long time to make up my orders. I have more seeds of varieties then I need or could grow in one season. I am all for variety, trying new things.
To me gardening is all about the adventure, doing things differently, experiencing new things and constantly learning something new. And having fun doing it.
If I just could get organized and get them started.
In this region, you must take your chance to go out, when it comes. The chance is, when the rain stops.
Last week I got out, it was a nice, rare sunny Oregon winter day. I was able to fill up some of my garden beds with some home made compost and some mint compost from Lane Forest Product, which is one of our local yard waste and wood recyclers. They sell all kinds of garden dirt and compost. Mint compost I have been told is a great supplement for tired and hard soil. I never heard of Mint compost before I moved here. Oregon used to have a lot of Mint farms, for Mint oil production, it leaves over a lot of waste material. Anyway I tried it last year and it seemed to do a good job. My dirt is looking better already. I am not making enough compost to fill these new garden beds so I am glad there are many places in town to get compost.
I just started last year converting some of my beds into raised Beds. Before, I just heaped the soil up into rectangular beds. There nothing was holding up the soil, eventually it all slipped into the walk ways, the neighbors cats, didn't help the matter either. They like to dig in my garden beds to do their business in it. I don't like the cats.

I didn't like how the weeds kept blowing into the beds from the walk way, it was hard to keep up with weeding. So I found these garden beds made in England at Gardener Supply Co, they are made of recycled plastic, you stick them together and they are affordable. They work and so far I am happy with them. Last year I did not have enough dirt to fill them. So I had to finish filling them up this year.
I also got a few more of the slim ones, for my Raspberries. I didn't like how the Raspberries constantly spread all over in the corner of the vegetable garden. They are shallow rooted and the boxes are 10" high. I put one of these fabrics for putting under mulch on the bottom, wrapping it in the inside of the box, then filled it up with my dirt mix and replanted them. I hope it works.
I like to garden, but I don't like unnecessary work. Anything I can do to reduce unnecessary work is good.

This week I was planning to put some of my seeds in the ground and in pots. But first I wanted to put all my seed information, when to plant what, according to the last Frost Date for our region into my
Garden Database software I have on my computer. Let me tell you, there is a lot of conflicting information about when the last and first frost is supposed to be. How is a Transplanted Gardener to know when to start what? Some claim the first frost to be May 21. others April 24., which is almost a month apart. I have been in this area only for 6 years, I have not yet seen any frost past April, so I chose the April date.
The week is not over yet, but so far I have not been able to get one seed into a pot. Instead I spent too much time, finding and sorting information on my computer and ordering new seeds.
Never mind I got some nice seeds, they were all open pollinated mostly Heirlooms. Open pollinated seeds fit more into my picture of trying to be a Self sustainable gardener. Luckily for me there are more and more companies selling Open-pollinated and Heirloom Vegetable Seeds. There are so many online companies, it took me a long time to make up my orders. I have more seeds of varieties then I need or could grow in one season. I am all for variety, trying new things.
To me gardening is all about the adventure, doing things differently, experiencing new things and constantly learning something new. And having fun doing it.
If I just could get organized and get them started.
Subscribe to:
Posts (Atom)