As some of you know I'm a Heirloom seed gardener. I don't plant hybrid seeds but only open-pollinated seeds, seeds that come true to type and can be saved. Over the years I have been saving more and more seeds of my plants. At first it was just the easy ones like lettuce and tomatoes, peppers anything that won't cross pollinate as bad and didn't need any special pollination care like isolation boxes or are a lot of work to process since I really didn't have any real seed screens instead using my kitchen sieves.
Now I save so many seeds every year, of so many varieties I really need to keep good track of what seed is in which seed bag.....I was getting to many little plastic baggies with 'unknown' variety or '???' written on them, because either the writing with the permanent marker had rubbed off or I forgot to label them right away, thinking I would remember which variety it was and then didn't.
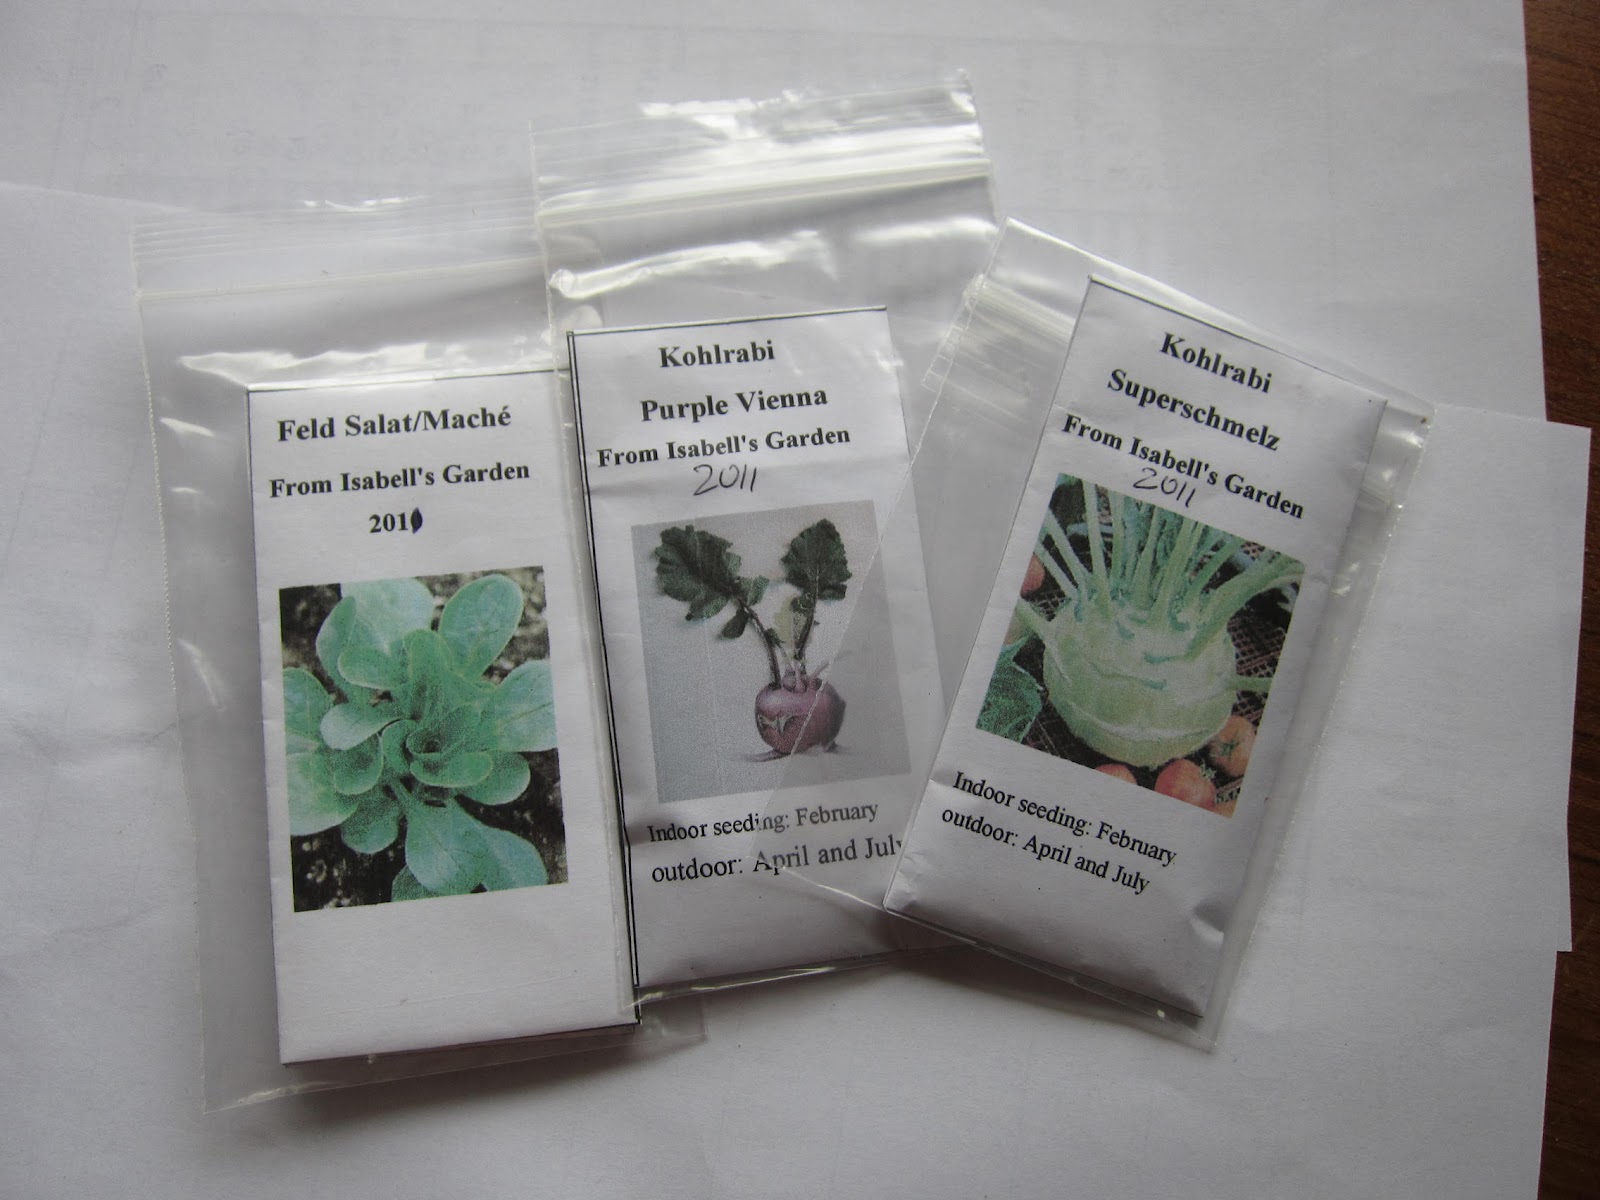
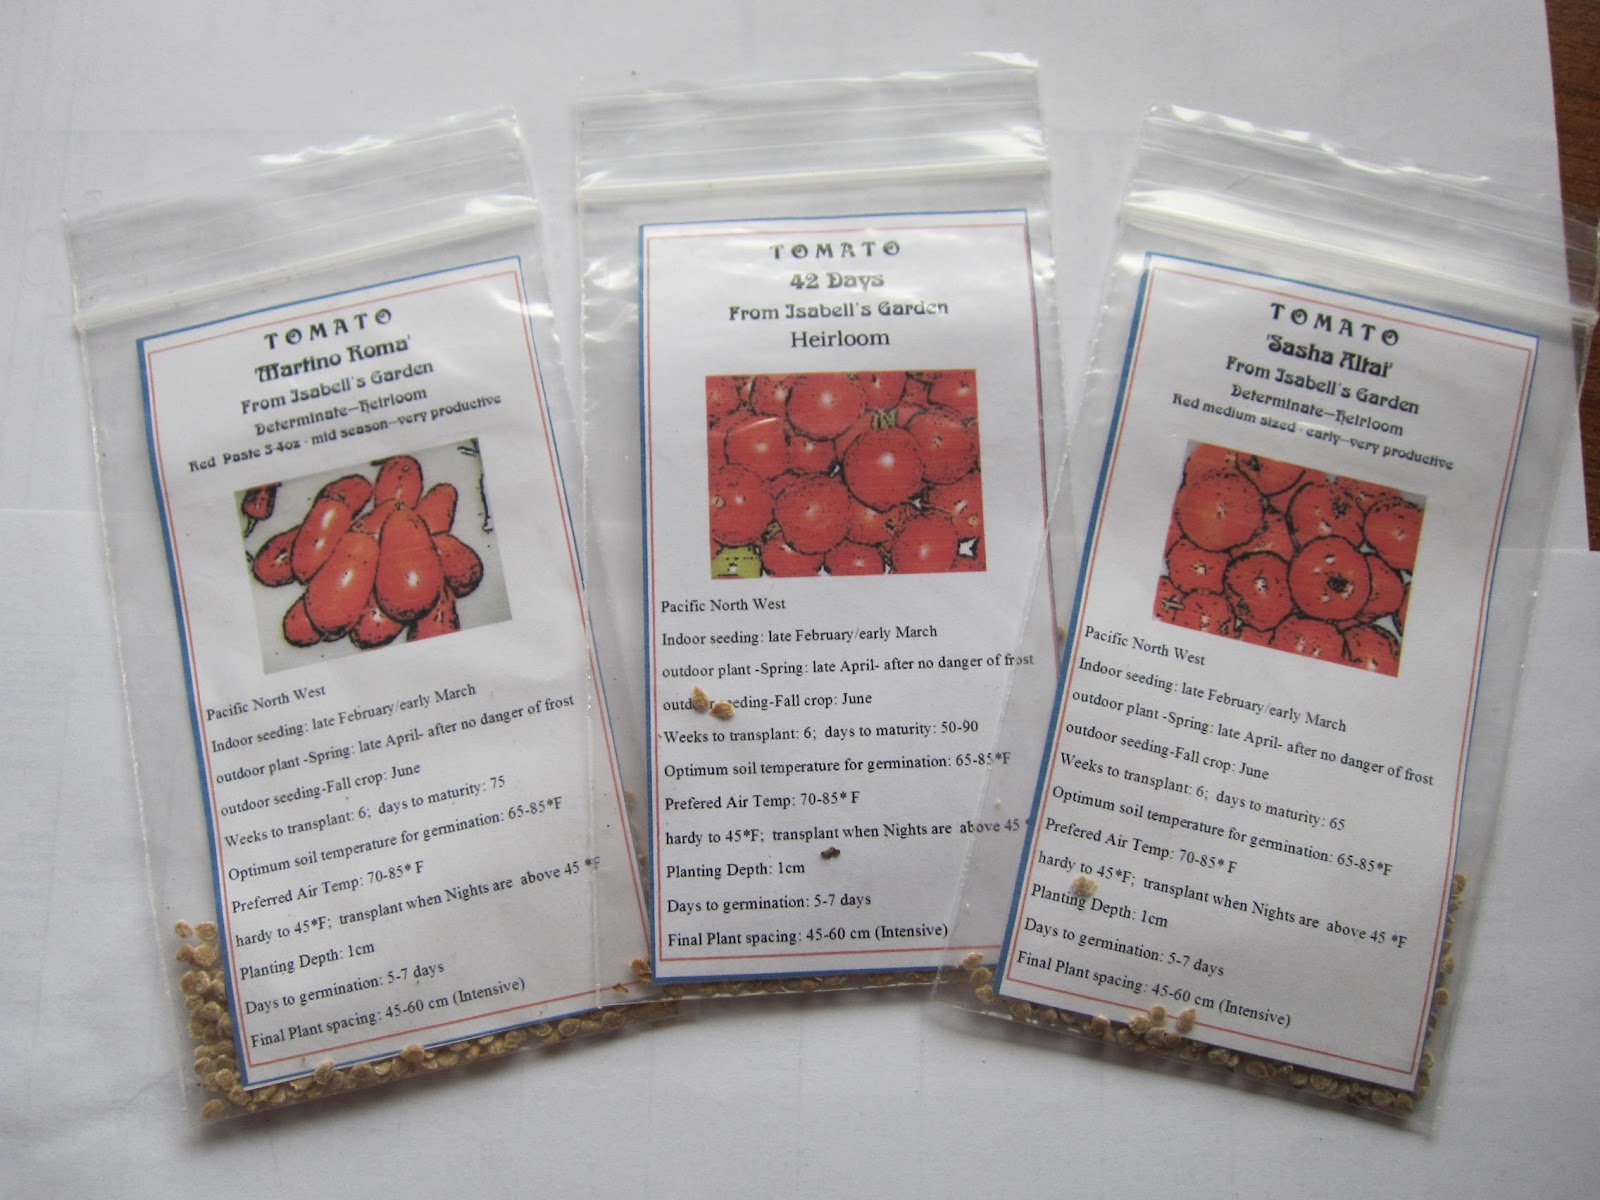
So last year I sat down with my Print-Shop software and designed a seed pack that would fit into a 3" x 5" plastic bag.
I added the name of the plant variety and very basic grow info on the design and added a picture of the vegetable plant. They were some nice seed packs but it took too much time to cut and glue them together every time I needed some. It ended up being a way bigger job then I wanted it to be.
I ended up just using the front side, cutting away the rest, since I was storing the seed envelopes in plastic bags anyway, I really didn't need all the paper. So this spring I decided to redesign the whole thing and came up with paper card inserts that perfectly fit into the plastic baggies and since a bit larger also were able to hold much more growing info.
I can also add many more inserts on one sheet of paper.......saving paper and trees. Also just having all the important growing info right in front of me when I need it, is just so nice, plus instead of cutting paper and gluing I get to have more fun planting and playing in my garden.
Showing posts with label seed saving. Show all posts
Monday, March 19, 2012
Monday, September 27, 2010
Seed Saving - Tomatoes
Generally seeds saved from open-pollinated or heirloom Tomato varieties breed true to type. Which means you get the same variety from the seed as the one you collected from. But although Tomato flowers are usually self-pollinated, occasionally they may be cross pollinated by insects about 2% of the time. If you want to prevent cross pollination completely 100% you should keep the different varieties about 10' apart. Flowers of older varieties, like some Heirloom Tomatoes, are said to often have longer styles then more modern cultivars. Because it protrudes more it is more accessible to bees and other insects so these varieties have a higher chance of getting cross pollinated.
But what is a typical backyard gardener to do, most of us don't have the garden space to isolate our Tomatoes for 10 feet apart? You could plant either tall barrier plants between the Tomato plants or put another pollen producing crop between the different varieties. Or you just do it as I do, chance it.
After all it is only a small chance of cross pollination and who knows maybe you get a cool, new tomato variety out of the deal.
For seed saving, pick the best looking fruits, from your healthiest looking, best producing plants, when they are fully ripe. It is a good idea to save seeds from several fruits to maintain a larger gene pool. No need to waste a tomato just for saving seeds. When you are ready to process a tomato for eating or cooking, just scratch some of the seed containing pulp into a small glass jar (old jam jars work really great), I usually add just a splash of water and then let it ferment at room temperature.
Don't put it in an especially warm place. At 80° F the fermentation takes about 2 days, at 70° F about 3 days. If you leave the seeds in the pulp for a longer period you get a better control of bacterial canker, which is a seed borne disease, but you should not let them ferment longer then 5 days or they might start to sprout. Stir the mixture each day and when it's ready, carefully pour most of the liquid with the pulp out, without loosing your seeds. You might have to keep adding water frequently to free the seeds from the pulp. Just add some more water, swirl, pour and do it until the water looks almost clean and there is no more pulp. Now you can strain it all over in a sieve, maybe rinse them some more and drop the seeds into a paper towel. Fold it over and let them dry for 3 to 7 days. After they are dry you can put the seeds in small zip lock bags or jars.
If you are saving seeds of many different cultivars it is advisable to label your jars with the name of the varieties you have. It is easy to get mixed up. Since I ferment several batches, after I am drying the first batch I put the jar with the label with the next batch on top of the corresponding Tomato variety drying in the paper towel.
But what is a typical backyard gardener to do, most of us don't have the garden space to isolate our Tomatoes for 10 feet apart? You could plant either tall barrier plants between the Tomato plants or put another pollen producing crop between the different varieties. Or you just do it as I do, chance it.
After all it is only a small chance of cross pollination and who knows maybe you get a cool, new tomato variety out of the deal.
For seed saving, pick the best looking fruits, from your healthiest looking, best producing plants, when they are fully ripe. It is a good idea to save seeds from several fruits to maintain a larger gene pool. No need to waste a tomato just for saving seeds. When you are ready to process a tomato for eating or cooking, just scratch some of the seed containing pulp into a small glass jar (old jam jars work really great), I usually add just a splash of water and then let it ferment at room temperature.
Don't put it in an especially warm place. At 80° F the fermentation takes about 2 days, at 70° F about 3 days. If you leave the seeds in the pulp for a longer period you get a better control of bacterial canker, which is a seed borne disease, but you should not let them ferment longer then 5 days or they might start to sprout. Stir the mixture each day and when it's ready, carefully pour most of the liquid with the pulp out, without loosing your seeds. You might have to keep adding water frequently to free the seeds from the pulp. Just add some more water, swirl, pour and do it until the water looks almost clean and there is no more pulp. Now you can strain it all over in a sieve, maybe rinse them some more and drop the seeds into a paper towel. Fold it over and let them dry for 3 to 7 days. After they are dry you can put the seeds in small zip lock bags or jars.
If you are saving seeds of many different cultivars it is advisable to label your jars with the name of the varieties you have. It is easy to get mixed up. Since I ferment several batches, after I am drying the first batch I put the jar with the label with the next batch on top of the corresponding Tomato variety drying in the paper towel.
Labels:
Heirloom vegetables,
Kitchen garden,
seed saving
Tuesday, October 6, 2009
Saving Seeds of Peas
Peas because they are big seeds and are contained in a pod, so don't scatter are easy to collect. They also belong to the self pollinating group, so come usually true to seed. There is a slight possibility that insect activity could produce a bit of cross pollination, however regular peas should not cross with sugar peas and vice versa. It's been never a problem for me but to prevent any crossing you can keep different varieties five to ten feet apart. Or, if you don't have the space, you could just plant only one variety of each kind each year and still be able to keep your seeds going there pea seed are viable for 3 years, if kept at cool, dry conditions.
Pea vines can become a tangled mess, which can make identification of individual plants difficult. It helps to keep the single plant just a bit apart for easy identification, or better plant a few pea plants separate from the ones you plan on eating just for seed production. To get a pound of seeds it will take about 15 feet of peas planted in a row, planted at the proper spacing, or the equivalent of that planted in a shorter but wider area. Peas need zinc to form peas in the pods so if you see not many pea seeds forming you might have zinc deficiency which can be corrected with adding Zinc-Sulfate to your soil.
Before you can shell the seeds for keeping, they need to thoroughly dry in the pod. Take them out to early they will rot. To make sure they are all completely dry it's a good idea to dry the vines in a well-aired area for a week or more, making sure you don't pack them to tight together so they don't become damp and rot. Damp seeds won't have good growing qualities. After they are dry you can hand crack the pods or thresh the seeds.
Store in good sealed containers or bags in a cool, dry environment or you can store them in the freezer, which should make them stay viable for at least five years. Before you plant them, you need to take them out of the freezer to defrost and warm up.
Pea vines can become a tangled mess, which can make identification of individual plants difficult. It helps to keep the single plant just a bit apart for easy identification, or better plant a few pea plants separate from the ones you plan on eating just for seed production. To get a pound of seeds it will take about 15 feet of peas planted in a row, planted at the proper spacing, or the equivalent of that planted in a shorter but wider area. Peas need zinc to form peas in the pods so if you see not many pea seeds forming you might have zinc deficiency which can be corrected with adding Zinc-Sulfate to your soil.
Before you can shell the seeds for keeping, they need to thoroughly dry in the pod. Take them out to early they will rot. To make sure they are all completely dry it's a good idea to dry the vines in a well-aired area for a week or more, making sure you don't pack them to tight together so they don't become damp and rot. Damp seeds won't have good growing qualities. After they are dry you can hand crack the pods or thresh the seeds.
Store in good sealed containers or bags in a cool, dry environment or you can store them in the freezer, which should make them stay viable for at least five years. Before you plant them, you need to take them out of the freezer to defrost and warm up.
Labels:
Peas,
seed saving,
seeds,
sustainable,
vegetable garden
Monday, September 28, 2009
Saving Seeds-The Easy Ones
To get seeds, the pollen has to be the correct kind, and it needs to get to the ovule at the right time of the plants vegetative growth to reproduce itself. Only the pollen of the related species will result in seeds. Seeds from a cabbage will not pollinate your tomato, since they are different species. Even within the same species, some plants won't get pollinated by their own pollen, even though they cross-pollinate easy within their plant family. Cabbage plants are a good example of this. To get good cabbage seeds, you need at least two of the same variety, better would be more, all flowering at the same time. But you need to keep them from being pollinated by another plant of the cabbage family, like Broccoli for example.
Some plants are easier to save seeds from then others. Some plants pollinate themselves, this means they accept their own pollen, from their own flowers either with or without insects.
This means for the gardener, you don't necessary need a whole bunch of the same plants to get viable seeds, although it's always better to save seeds from several plants of the same kind; this also means they cross pollinate rarely with each other and the seed will result in plants which look just like the parent plant because the inheritance is the same.
You do have to make sure, that you don't have a Hybrid plant, hybrids unfortunately will not result into a plant which looks like it's parent.
Plants which fall into this category of 'Self Pollinating' plants are:
Barely, Lima Beans, Snap Beans, Cow Peas, English Garden Peas, Endive, Lettuce, Corn Salad, Oats, Soy Beans, Tomatoes and Wheat.
Being self pollinating makes them the best choice for the 'Beginner Seed Saver'. These are the plants you should start with.
In fact, many of those are so easy to grow, if you don't want to bother with picking the seeds, you could just let them bolt to seed and if your climate allows, let them seed themselves. I have been doing this with my lettuce and corn salad for years, I find sometimes the seeds sprout easier this way, then if I seed them by hand. Over the years I introduced a new lettuce variety each year, I now easily get 10 different lettuce varieties, all seeded by themselves. I just dig up as many seedlings as I want and move them to the proper location. I also always have plenty seedlings to give away to my friends or neighbors. I still collect seeds of the plants anyway, to be able to start the lettuce in the off, hot season, when it won't start itself outside, but growing lettuce this way gives me a very early spring crop. The plants know when the weather is just right to sprout. It never failed for me.
When should the seeds get collected?
This all depends on which seed you want to collect. Some seeds, can be collected before they are completely mature and dry, get dried off the plant and they will grow fine this way. Other seeds won't sprout if you collect them immature.
Seeds of Lettuce, Spinach, Tomatoes, Snap Beans, Corn Salad and Radishes will grow alright, even if you collect them immature. Seeds of Peppers, Carrots, Celery, Peas don't germinate so well if you collect them before they are ripe.
That said, it still is always better to let the seeds ripen fully, you just get a better germination rate that way.
Since Lettuce is one of the easiest one to save seeds from I will share how to save it's seeds.
Lettuce:
Save the seeds from the plant which bolts the slowest.
Leaf lettuce is supposed to be easier to save seeds from. Head lettuce, matures later then leaf lettuce and because some produce tight heads, sometimes you need to cross cut an inch or so into the top of the head, so the seed stalk can come out. I never had this problem yet, but most of my head lettuces make a more loose head.
Lettuce will get a tall stalk with lot's of little, daisy like flowers, similar to Dandelion, which lettuce is related to. The yellow flowers will turn into downy white seeds heads, just like Dandelion. They don't always turn all downy at the same time, so if you want the seeds in your bag instead them seeding themselves out, you have to frequently snip the downy seed heads off. Or you can put a paper-bag over the seed head, tie it below (so the seeds don't fall out) and then let them ripen into the bag. You also could just wait until most flowers turned into downy or are close to being downy, cut the whole stalk off and cure it in an airy place, either inside a paper bag or have a sheet underneath it. Keep in mind if it rains, the seeds can be knocked off the plants.
I usually just wait until most seeds are downy and then shake them off inside a paper bag.
Keep the seeds inside a well sealed container or bag. There lettuce sprouts better after a cold spell I keep mine in the freezer, this especially works better to grow lettuce in the summer months.
Some plants are easier to save seeds from then others. Some plants pollinate themselves, this means they accept their own pollen, from their own flowers either with or without insects.
This means for the gardener, you don't necessary need a whole bunch of the same plants to get viable seeds, although it's always better to save seeds from several plants of the same kind; this also means they cross pollinate rarely with each other and the seed will result in plants which look just like the parent plant because the inheritance is the same.
You do have to make sure, that you don't have a Hybrid plant, hybrids unfortunately will not result into a plant which looks like it's parent.
Plants which fall into this category of 'Self Pollinating' plants are:
Barely, Lima Beans, Snap Beans, Cow Peas, English Garden Peas, Endive, Lettuce, Corn Salad, Oats, Soy Beans, Tomatoes and Wheat.
Being self pollinating makes them the best choice for the 'Beginner Seed Saver'. These are the plants you should start with.
In fact, many of those are so easy to grow, if you don't want to bother with picking the seeds, you could just let them bolt to seed and if your climate allows, let them seed themselves. I have been doing this with my lettuce and corn salad for years, I find sometimes the seeds sprout easier this way, then if I seed them by hand. Over the years I introduced a new lettuce variety each year, I now easily get 10 different lettuce varieties, all seeded by themselves. I just dig up as many seedlings as I want and move them to the proper location. I also always have plenty seedlings to give away to my friends or neighbors. I still collect seeds of the plants anyway, to be able to start the lettuce in the off, hot season, when it won't start itself outside, but growing lettuce this way gives me a very early spring crop. The plants know when the weather is just right to sprout. It never failed for me.
When should the seeds get collected?
This all depends on which seed you want to collect. Some seeds, can be collected before they are completely mature and dry, get dried off the plant and they will grow fine this way. Other seeds won't sprout if you collect them immature.
Seeds of Lettuce, Spinach, Tomatoes, Snap Beans, Corn Salad and Radishes will grow alright, even if you collect them immature. Seeds of Peppers, Carrots, Celery, Peas don't germinate so well if you collect them before they are ripe.
That said, it still is always better to let the seeds ripen fully, you just get a better germination rate that way.
Since Lettuce is one of the easiest one to save seeds from I will share how to save it's seeds.
Lettuce:
Save the seeds from the plant which bolts the slowest.
Leaf lettuce is supposed to be easier to save seeds from. Head lettuce, matures later then leaf lettuce and because some produce tight heads, sometimes you need to cross cut an inch or so into the top of the head, so the seed stalk can come out. I never had this problem yet, but most of my head lettuces make a more loose head.
Lettuce will get a tall stalk with lot's of little, daisy like flowers, similar to Dandelion, which lettuce is related to. The yellow flowers will turn into downy white seeds heads, just like Dandelion. They don't always turn all downy at the same time, so if you want the seeds in your bag instead them seeding themselves out, you have to frequently snip the downy seed heads off. Or you can put a paper-bag over the seed head, tie it below (so the seeds don't fall out) and then let them ripen into the bag. You also could just wait until most flowers turned into downy or are close to being downy, cut the whole stalk off and cure it in an airy place, either inside a paper bag or have a sheet underneath it. Keep in mind if it rains, the seeds can be knocked off the plants.
I usually just wait until most seeds are downy and then shake them off inside a paper bag.
Keep the seeds inside a well sealed container or bag. There lettuce sprouts better after a cold spell I keep mine in the freezer, this especially works better to grow lettuce in the summer months.
Labels:
lettuce,
seed saving,
seeds,
sustainable,
vegetable garden
Thursday, September 17, 2009
Benefits of Saving Seeds
Saving your own seeds has a lot of benefits.
If you save the seeds from the plants which did best in your micro climate of your vegetable garden, the ones which were most frost resistant, more drought tolerant, germinated the earliest, bolted late, eventually you end up with your own specific plant, one which is best suited to your gardens environment. Even selecting the seeds without these specific criteria, just simply saving the seeds from plants which seem to grow best in your garden will often condition the strain of the plant to the micro climate of the place it's planted regularly.
Another benefit is, that you can improve the vegetables quality. Just by selecting the seeds of the plants which taste best, yield the most, grow the fastest, give an early harvest, grow the biggest, had the best color, had the least disease problems, less pest problems, or any other quality you desire, if you save seeds from the best plants eventually, over a period of years, you get an improved strain with better qualities then the original seed.
Saving seeds also saves money. I admit, seeds are really not that expensive, but saving them, they cost nothing.
Plus you might eventually find a new strain of a vegetable growing in your garden, one which came about through a mutation or cross pollination, you now have a new vegetable strain, a Heirloom Vegetable and you only can keep it going by saving the seeds. You can't buy that one in any catalog, it only comes from your garden. There are many vegetables offered by seed companies which started out being a heirloom strain, that were developed by back yard gardeners and had been grown and saved for many years or even generations. Keeping these seeds going is a great gift to the future generations, a great gift to the world.
And last saving seeds is a sustainable task. Instead of relying on a seed company to keep your favorite seeds in stock, you are relying on yourself. You don't need to worry, a seed you really liked maybe won't be available next year in your favorite catalog. Your supply of your well chosen seeds, if correctly stored will feed you next year. Price, postage or fuel increases won't affect you.
Being self reliant also can give a satisfaction of knowing you can take care of yourself. Being able to provide for yourself, and maybe for your extended family, your friends and improving your own seeds is something to be proud of.
After all they are unique, they are your very own seeds, you can't get them anywhere else but from your garden.
If you save the seeds from the plants which did best in your micro climate of your vegetable garden, the ones which were most frost resistant, more drought tolerant, germinated the earliest, bolted late, eventually you end up with your own specific plant, one which is best suited to your gardens environment. Even selecting the seeds without these specific criteria, just simply saving the seeds from plants which seem to grow best in your garden will often condition the strain of the plant to the micro climate of the place it's planted regularly.
Another benefit is, that you can improve the vegetables quality. Just by selecting the seeds of the plants which taste best, yield the most, grow the fastest, give an early harvest, grow the biggest, had the best color, had the least disease problems, less pest problems, or any other quality you desire, if you save seeds from the best plants eventually, over a period of years, you get an improved strain with better qualities then the original seed.
Saving seeds also saves money. I admit, seeds are really not that expensive, but saving them, they cost nothing.
Plus you might eventually find a new strain of a vegetable growing in your garden, one which came about through a mutation or cross pollination, you now have a new vegetable strain, a Heirloom Vegetable and you only can keep it going by saving the seeds. You can't buy that one in any catalog, it only comes from your garden. There are many vegetables offered by seed companies which started out being a heirloom strain, that were developed by back yard gardeners and had been grown and saved for many years or even generations. Keeping these seeds going is a great gift to the future generations, a great gift to the world.
And last saving seeds is a sustainable task. Instead of relying on a seed company to keep your favorite seeds in stock, you are relying on yourself. You don't need to worry, a seed you really liked maybe won't be available next year in your favorite catalog. Your supply of your well chosen seeds, if correctly stored will feed you next year. Price, postage or fuel increases won't affect you.
Being self reliant also can give a satisfaction of knowing you can take care of yourself. Being able to provide for yourself, and maybe for your extended family, your friends and improving your own seeds is something to be proud of.
After all they are unique, they are your very own seeds, you can't get them anywhere else but from your garden.
Labels:
seed saving,
seeds,
sustainable,
vegetable garden
Monday, March 2, 2009
Tools for the seed collector
Are you collecting your own seeds? Where do you keep them? Do you keep them in little zip lock bags, like I do? Or in little containers?
I used to keep them in old Film containers, but unfortunately I don't have those around anymore since I went digital.
Do you label them with Permanent Markers, which end up not being really that permanent?
So now you are left with seeds in a bag and you can't remember which ones?
Has that happened to you?
Don't despair, I came across something really neat to solve our problem. How about printing your own seed packet?
You can find printable seed packets in different sizes at Homes and Garden Website plus canning labels, recipe cards and other neat printouts.
You can also use Photo shop to use your own picture, how neat is that?
As always, our fellow Gardeners are a great bunch of people, to share what they come up with.
Thank you! Fellow Gardener
I used to keep them in old Film containers, but unfortunately I don't have those around anymore since I went digital.
Do you label them with Permanent Markers, which end up not being really that permanent?
So now you are left with seeds in a bag and you can't remember which ones?
Has that happened to you?
Don't despair, I came across something really neat to solve our problem. How about printing your own seed packet?
You can find printable seed packets in different sizes at Homes and Garden Website plus canning labels, recipe cards and other neat printouts.
You can also use Photo shop to use your own picture, how neat is that?
As always, our fellow Gardeners are a great bunch of people, to share what they come up with.
Thank you! Fellow Gardener
Subscribe to:
Posts (Atom)