When I first started gardening, way back then in late 1980's it didn't take long before I came across my good old Newspaper Pot Maker. I never liked the Jiffy Pots, I think they kill more vegetables then they grow for you and plastic pots, back then, weren't recycled, also I didn't want to waste our money on buying plastic pots to grow vegetables. So when I came across the Paper Pot Maker it was Love at first site.
What couldn't you love on that thing? It forced you to recycle the newspaper! Back then they didn't even recycle Newspaper where we lived, nope there was no recycle pick up at our town. You could get the best soil mix you could get your hand on, or make your own instead having to rely on whatever they put into those Jiffy pots. Okay, you could do that with plastic pots also, but........no more messed up roots when you transplant, since you plant the whole pot and all. What is not to love!
For a few years I lost my way, I admit, I got lazy, I got plastic pots and filled them with dirt. I tried all the newest growing pots, growing systems trying to find the one that just might be the best growing system ever invented.
I never found it, I think it doesn't exist or maybe I just had it all along. Paper pot!
Nevertheless I think I have to retire my good old paper pot maker.
No, not what you think...no, I didn't fall of the wagon.
It is just simple, I found the best new Tool for growing my vegetables..........A better Paper-pot Maker!
It is much simpler to use then the older model and makes pots about 7.5 x 7cm wide instead 5.5 x 5.5 cm as the old one that are also much more solidly built. I tweaked the instruction a bit because it was easier with less cutting involved and made for even sturdier pots.
start out with a half page of newspaper
Fold about 2/3 over lengthwise
fold a edge over about 3/4 to 1 inch on the folded edge, with the last third cut in so it is not folded over
roll the paper pot along the edge, but keep
the open edge loose
like you see in this picture
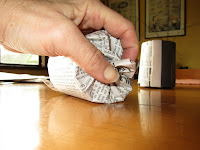
This is probably the most tricky part. You grasp the paper at the bottom
and twist it together and push it into the hole at the bottom of the pot
Like that. Now push the paper pot, with the pot maker in it
down on a surface, to seal and flatten the bottom nicely
Almost done!
Twist the wooden pot maker out of the paper
and fold the edge that sticks out on top to the inside, that is
what makes the pot sturdier and holding together better then the old.
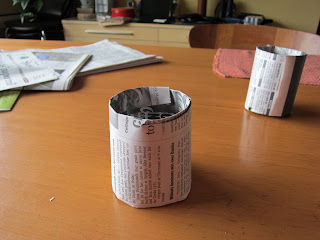
Voila! You just made yourself a paper pot
You can get the Paper pot maker here, it comes in two sizes
http://www.seedandgarden.com/shop/products/NViroPotter-Paper-Pot-Making-Tool.html


2 comments:
I have the same tool and it definitely is fantastic!
I have the same tool plus I have the smaller one. I've made several paper pots for seed starting this season. The pots are holding up and we're about ready to transplant them into larger pots which will go on our balcony!
Post a Comment